For many years I forged with only my eyes to judge the temps in my forge. Eventually I purchased a commercial Pryometer for my forge(s), but found them to be VERY expensive, with relatively short life spans. After experimenting with various parts, I stumbled upon a way to build a very economical forge pyrometer that is easy to build, and long lasting. In this article I'll show you all the needed parts, and walk you through building one for yourself. Click on the pic to go to the source for that part
The parts you will need:
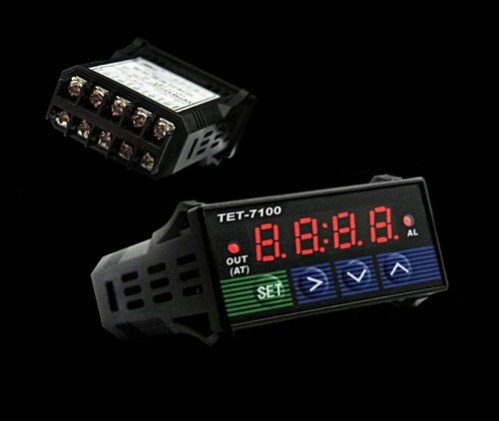
A Universal, single line readout PID controller (click on the above image)
This PID will operate from just about any voltage source, download the manual below.
Follow this link, and find the EXACT model number for you PID
This PID will operate from just about any voltage source, download the manual below.
Follow this link, and find the EXACT model number for you PID
A type K Thermocouple (click on the image to go to the item on Omega.com)
I use item # KQXL-14U-12
I use item # KQXL-14U-12
An old electric cord of some type...anything from 18 gauge wire or larger will do.
(I used an old lamp cord)
(I used an old lamp cord)
Putting the parts together and installing...
Putting the parts together is straight forward and dead simple.
Downlaod the Manual for diagrams
(Find the model number for your PID and download that manual)
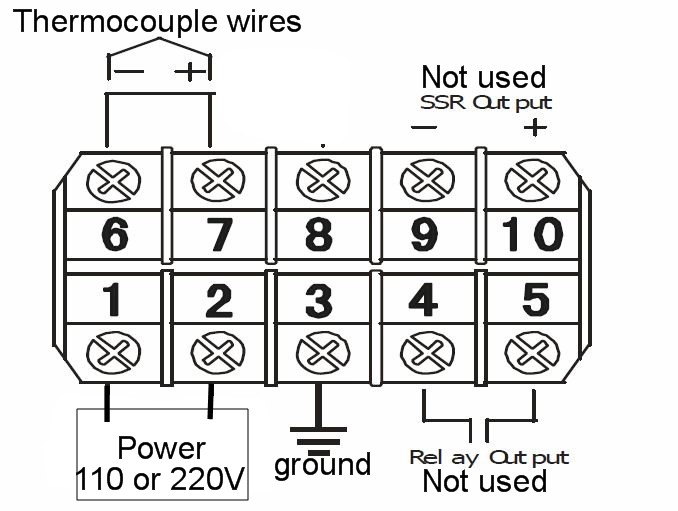
1. Wire the old cord to terminals #1 & #2 (polarity does not matter)
2. Wire the thermocouple to terminals #6 (negative thermocouple wire) & #7 (positive thermocouple wire)
Putting the parts together is straight forward and dead simple.
Downlaod the Manual for diagrams
(Find the model number for your PID and download that manual)
1. Wire the old cord to terminals #1 & #2 (polarity does not matter)
2. Wire the thermocouple to terminals #6 (negative thermocouple wire) & #7 (positive thermocouple wire)
Follow the directions in the user manual for setting the PID to F or C temp reading.
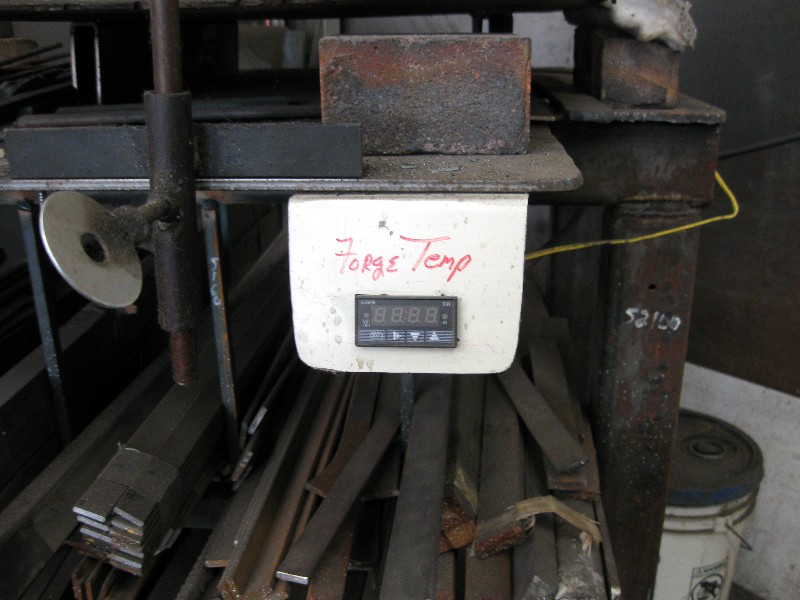
The PID will not come with any kind of mount or holder...I suggest buiding on for thin sheet metal. Using calipers, simply measure the height and width of the PID, transfer those measurements to the piece of sheet metal, and cut out the rectangular hole. The PID will slide into the hole, and lock itself into place.
I simply bent the upper portion of the sheet metal , and mounted it to my forge table with screws.
Thermocouple Placement: I recommend drilling a hole only slightly larger then the diameter of your thermocouple through the forge body. For a horizontal forge, I recommend placing the hole near the rear of the forge, above the centerline of the forge body. If in a vertical forge, placement should be toward the rear of the forge body, and near the top. Both of these mounting locations will keep the thermocouple out of your way, and will give you the most accurate temp readings. A note on how much of the thermocouple to insert....only the first 1" of a thermocouple gives any reading...when you place the thermocouple into the hole created in the forge body, place it so only about 3/4"-1" is visible inside the forge chamber....this will give accurate readings, and will help the thermocouple last longer.
You can also wire in a switch of some type to turn the power on/off, but being that I'm lazy, I simply plug and unplug the cord.
That's all there is to it! Rather then shell out big bucks for a prebuilt pyrometer, you can easily build your own for much less!
You can also wire in a switch of some type to turn the power on/off, but being that I'm lazy, I simply plug and unplug the cord.
That's all there is to it! Rather then shell out big bucks for a prebuilt pyrometer, you can easily build your own for much less!


Building a Forge Pyrometer


"Nobody Cares What you Know...
Until They Know You Care!"
Until They Know You Care!"
Copyright 2024/25: "The Montana Bladesmith"
406-727-9102